背景
NGINX で ベーシック認証を利用してリバースプロキシに認証機能を持たせてもよかったのだが、パスワードマネージャーが使えない。認証用の Web フォームを作ったらもろもろ楽になるんじゃないかと思って作ってみた
FYI
認証後 Laravel (もしくは Jetstream) のミドルウェアによりルーティングされて Dashboard が表示されます。認証が Dashboard を表示させずにバックエンドにプロキシさせる方法は現在模索中です
どなたかご存じでしたら教えてください
構成
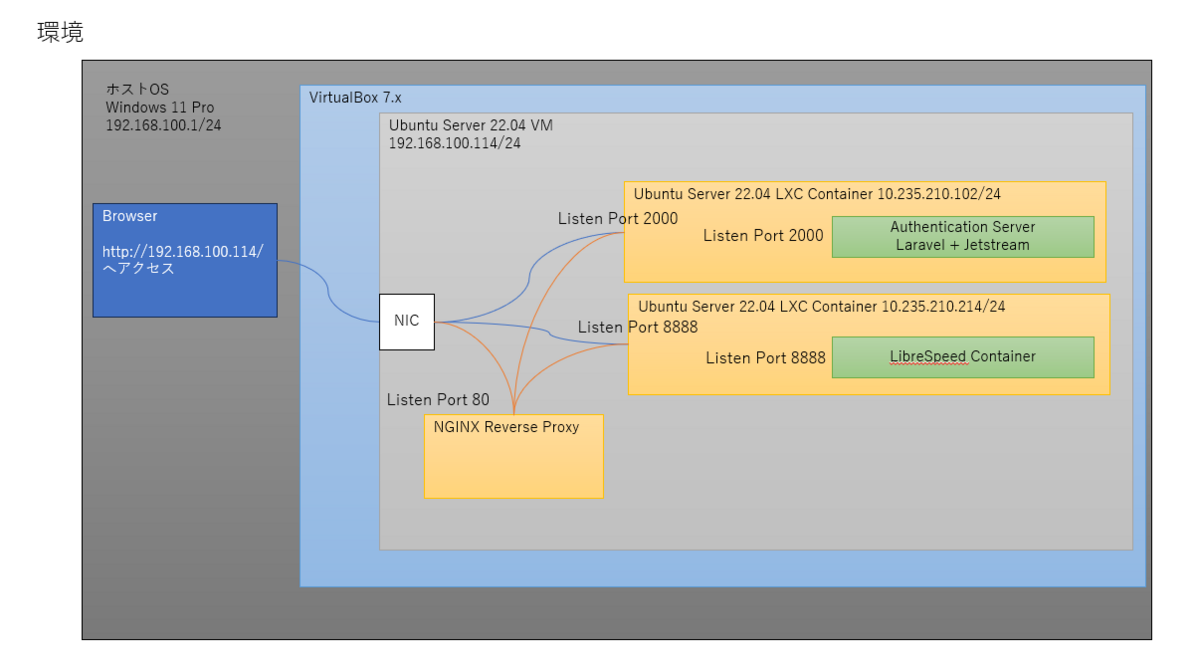
全体の流れ
- Laravel + Jetstream で認証基盤を作る
- バックエンドを作る
- NGINX のリバースプロキシを作る
- テスト
イメージ
Laravel + Jetstream で認証基盤を作る
LXC コンテナを作る
lxc launch ubuntu:22.04 app1
lxc shell app1
mkdir auth
cd auth
基本環境を作る
過去記事参照
Laravel 環境構築の備忘録 for Ubuntu Server 22.04 - takashi kono's blog
認証済み判定のルートを作る
vim routes/web.php
<?php

use Illuminate\Support\Facades\Route;
use Illuminate\Http\Request;  // ここを追加している

/*
|--------------------------------------------------------------------------
| Web Routes
|--------------------------------------------------------------------------
|
| Here is where you can register web routes for your application. These
| routes are loaded by the RouteServiceProvider and all of them will
| be assigned to the "web" middleware group. Make something great!
|
*/

Route::get('/', function () {
    return view('welcome');
});

// ----- ここから追加
Route::get('/auth-check', function (Request $request) {
    if ($request->user()) {
        return response()->json(['message' => 'Authenticated'], 200);
    } else {
        return response()->json(['message' => 'Not Authenticated'], 401);
    }
});
// ----- ここまで

Route::middleware([
    'auth:sanctum',
    config('jetstream.auth_session'),
    'verified',
])->group(function () {
    Route::get('/dashboard', function () {
        return view('dashboard');
    })->name('dashboard');
});
適当に Dashboard にリンクを作る
vim resources/views/components/welcome.blade.php
Sample HTML
<div class="p-6 lg:p-8 bg-white border-b border-gray-200">

    <h1 class="mt-8 text-2xl font-medium text-gray-900">
        Welcome to your dashboard
    </h1>

    <p>
        <a href="http://192.168.100.114/">LibreSpeed</a>
    </p>
</div>
テストを作って検証
テストケースを作る
php artisan make:test AuthCheckTest
テストコードを作る
<?php

namespace Tests\Feature;

use App\Models\User; // これを追記しておく
use Illuminate\Foundation\Testing\RefreshDatabase;
use Illuminate\Foundation\Testing\WithFaker;
use Tests\TestCase;

class AuthCheckTest extends TestCase
{
    // デフォルトで記載されているものを削除
    // 以下を記述する
    use RefreshDatabase;

    public function test_authenticated_user()
    {
        $user = User::factory()->create();

        $response = $this->actingAs($user)->get('/auth-check');

        $response->assertStatus(200)
                 ->assertJson(['message' => 'Authenticated']);
    }

    public function test_unauthenticated_user()
    {
        $response = $this->get('/auth-check');

        $response->assertStatus(401)
                 ->assertJson(['message' => 'Not Authenticated']);
    }
}
テストを実行
# 全体をやるなら
php artisan test
# このテストだけしたいなら
php artisan test tests/Feature/AuthCheckTest.php
sample
$ php artisan test tests/Feature/AuthCheckTest.php

   PASS  Tests\Feature\AuthCheckTest
  ? authenticated user                                                            0.29s
  ? unauthenticated user                                                          0.01s

  Tests:    2 passed (4 assertions)
  Duration: 0.38s

$
アプリを起動
php artisan serve --host=0.0.0.0 --port=2000
認証用の LXC Proxy を作る
lxc config device add <instance_name> <device_name> <type> \
  listen=<tcp|udp>:<source_ip_address>:<source_port> \
  connect=<tcp|udp>:<container_ip_address>:<container_port>

# なので
lxc config device add app1 auth-proxy proxy \
  listen=tcp:192.168.100.114:2000 \
  connect=tcp:<container_ip_address>:2000

# 確認
lxc config device show app1
バックエンドを作る
せっかくなので、LibreSpeed を作る
バックエンド用の LXC コンテナを作る
lxc launch ubuntu:22.04 backend
lxc shell backend
Docker Engine をインストール
参考
Install Docker Engine on Ubuntu | Docker Docs
現在のものが古いかもしれないので削除
for pkg in docker.io docker-doc docker-compose podman-docker containerd runc; do sudo apt-get remove $pkg; done
前準備
# Add Docker's official GPG key:
sudo apt update
sudo apt install ca-certificates curl gnupg
sudo install -m 0755 -d /etc/apt/keyrings
curl -fsSL https://download.docker.com/linux/ubuntu/gpg | sudo gpg --dearmor -o /etc/apt/keyrings/docker.gpg
sudo chmod a+r /etc/apt/keyrings/docker.gpg

# Add the repository to Apt sources:
echo \
  "deb [arch="$(dpkg --print-architecture)" signed-by=/etc/apt/keyrings/docker.gpg] https://download.docker.com/linux/ubuntu \
  "$(. /etc/os-release && echo "$VERSION_CODENAME")" stable" | \
  sudo tee /etc/apt/sources.list.d/docker.list > /dev/null
sudo apt update
インストール
sudo apt-get install docker-ce docker-ce-cli containerd.io docker-buildx-plugin docker-compose-plugin
docker-compose.yml を作る
まず、プロジェクトのディレクトリを作る
mkdir -p /path/to/dir
cd $_
docker-compose.yml を作る
cat << 'EOL' > docker-compose.yml
version: '3.3'
services:
  librespeed:
    image: adolfintel/speedtest
    container_name: librespeed
    ports:
      - 0.0.0.0:8888:80
    environment:
      - NODE=standalone
      - TITLE=Speedtest
      - TELEMETRY=true
    restart: unless-stopped

EOL
イメージを持ってきて起動
sudo docker compose pull
sudo docker compose build # 初回ならこれ不要説ある?
sudo docker compose up -d
listen しているか確認
ss -altn
認証用の LXC Proxy を作る
lxc config device add <instance_name> <device_name> <type> \
  listen=<tcp|udp>:<source_ip_address>:<source_port> \
  connect=<tcp|udp>:<container_ip_address>:<container_port>

# なので
lxc config device add backend backend-proxy proxy \
  listen=tcp:192.168.100.114:8888 \
  connect=tcp:<container_ip_address>:8888

# 確認
lxc config device show backend
NGINX でリバースプロキシを作る
ポイントは auth_request
これを使うと、NGINX がサブリクエストを行う
認証済みなら 200, NG なら 401 を返すコードを書いてあげればよい
NGINX のインストール
sudo apt install nginx
sudo systemctl status nginx
もし、起動できなかったら
Apache2 が動いている可能性があるので、プロセスを止めて、自動起動求めてから NGINX を動かすとよいです。
systemctl status apache2
sudo systemctl stop apache2
sudo systemctl disable apache2

# 忘れずにリスタート
sudo systemctl restart nginx
systemctl status nginx
デフォルトのページを無効化
cd /etc/nginx/site-enabled
sudo unlink 000-default
sudo nginx -t
sudo systemctl restart nginx
リバースプロキシの設定
sudo vim conf.d/librespeed.conf
sample
ポイントは、 auth_request を使うことと、proxy_set_header Cookie $http_cookie; です
Cookie も送ってあげます
server {
    server_name _;
    listen      0.0.0.0:80;

    location / {
        auth_request /check-auth;  # サブリクエストをしてくれる
        error_page 401 =302 http://192.168.100.114:2000/login; # 認証失敗時用

        proxy_pass http://192.168.100.114:8888/; # 実際に行きたいバックエンド
        proxy_set_header Host $host;
        proxy_set_header X-Real-IP $remote_addr;
        proxy_set_header X-Forwarded-For $proxy_add_x_forwarded_for;
    }

    location /check-auth {
        # 認証済みチェック用
        internal;
        proxy_pass http://192.168.100.114:2000/check-auth;
        proxy_pass_request_body off;
        proxy_set_header Content-Length "";
        proxy_set_header X-Original-URI $request_uri;
        proxy_set_header Cookie $http_cookie;
    }
}
デバッグ用ログの設定 (任意)
        ##
        # Logging Settings
        ##
        log_format main '$remote_addr - $remote_user [$time_local] "$request" '
                '$status $body_bytes_sent "$http_referer" '
                '"$http_user_agent" "$http_x_forwarded_for" '
                'Subrequest Status: $upstream_status'
                'Auth Header: $auth_header';


        access_log /var/log/nginx/access.log main;
        # error_log /var/log/nginx/error.log;
        error_log /var/log/nginx/error.log debug;
起動
# config test
sudo nginx -t
sudo systemctl restart nginx
テスト
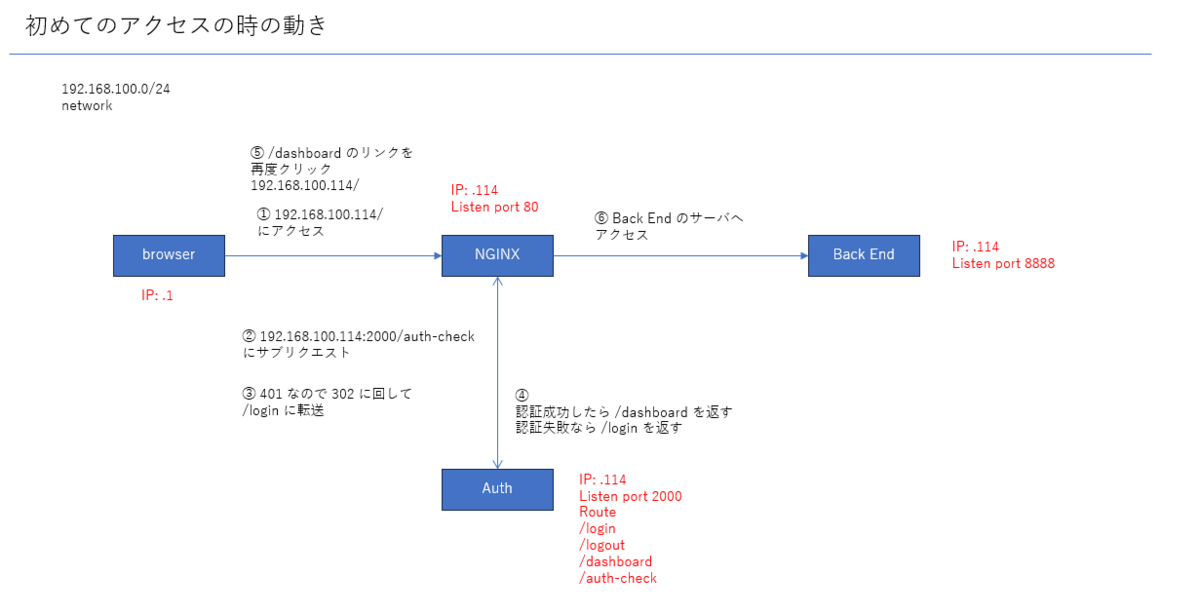
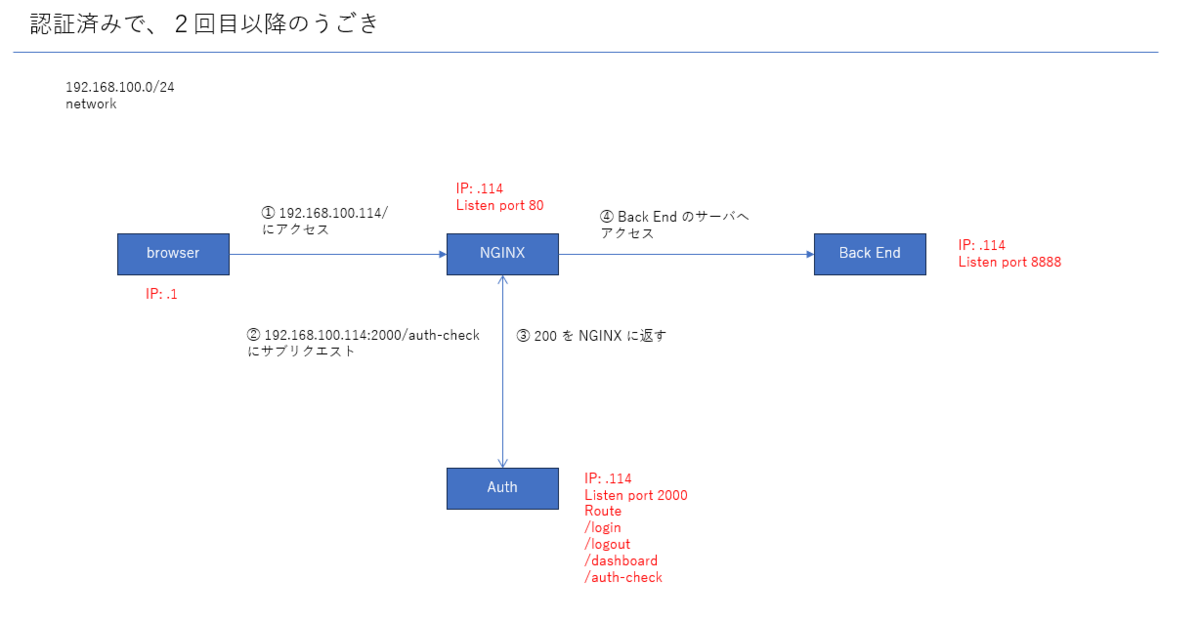
想定
http://192.168.100.114/にアクセスするhttp://192.186.100.114:2000/auth-checkに NGINX がサブリクエストを行う- 認証していないので、401 を NGINX に返す
- 401 を受け取った NGINX は 302 の設定を見る
- 302 を見た NGINX は
http://192.168.100.114:2000/loginへプロキシする - 認証する
- 認証成功すると "Laravel の中で" ルーティングが行われ、
/dashboardを表示させる - ダッシュボードの
http://192.168.100.114/をクリックする - Back End のページが開く
後で動画を掲載する
感想
とりあえずここまで来れてよかった
ただ、見落としがありそう。ドキドキ